使用Hexo从零开始搭建Blog

今天是农历6月13,对我来说是一个特别的日子。

我们来使用hexo生成静态博客并架设在免费的github page平台,看看会发生什么。

准备

我的电脑系统是win7 64bit,node.js 版本 v4.4.4,本教程只针对windows用户。

正文

安装git

安装方法请自行百度

安装Node.js

安装方法请自行百度

安装hexo

安装前先介绍几个hexo常用的命令,#后面为注释。

1
2
3
4
$ hexo g #完整命令为hexo generate,用于生成静态文件
$ hexo s #完整命令为hexo server,用于启动服务器,主要用来本地预览
$ hexo d #完整命令为hexo deploy,用于将本地文件发布到github上
$ hexo n #完整命令为hexo new,用于新建一篇文章

在电脑里选择一个目录建立一个文件夹(例如D:\hexo),双击建好的文件夹进入文件夹,鼠标右键任意地方,选择Git Bash,使用以下命令安装hexo(ps:以下命令中的$符号只为了让教程和实际看起来一致,实际输入命令只需输入$ 后面的命令即可)

1
$ npm install hexo-cli -g

验证软件是否正确安装

1
2
3
$ git --version
$ node -v
$ npm -v

hexo初始化

1
$ hexo init

安装依赖包

1
$ npm install

让我们看看刚刚下载的hexo文件带来了什么,在D:\hexo内执行以下命令,

1
2
$ hexo g
$ hexo s

然后用浏览器访问 http://localhost:4000/ ,此时,你应该看到了一个漂亮的博客了,当然这个博客只是在本地的,别人是看不到的,hexo3.0使用的默认主题是landscape。

注册Github帐号

已经有Github帐号跳过此步,首先进入Github进行注册,用户名、邮箱和密码之后都需要用到,自己记好。

创建repository

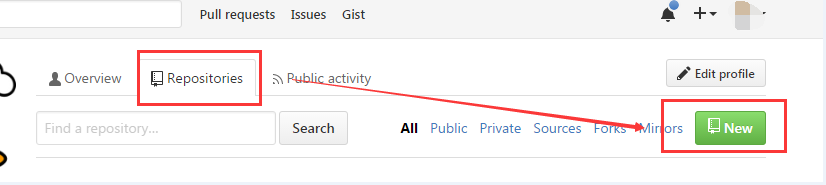
repository相当于一个仓库,用来放置你的代码文件。首先,登陆进入Github,并进入个人页面,选择Repositories(下图第一个红圈的地方),然后New一个repository(下图第二个红圈的地方)

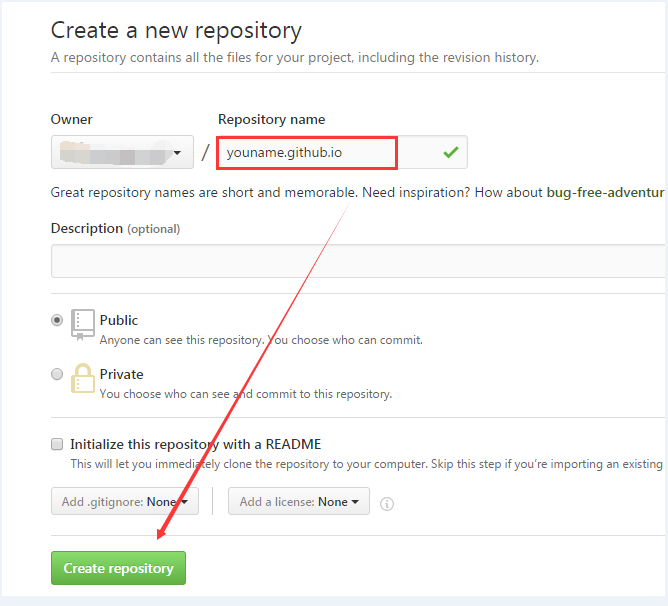
创建时,只需要填写Repository name即可,当然这个名字的格式必须为youname.github.io,例如我的为leezp.github.io

部署本地文件到github

既然Repository已经创建了,当然是先把博客放到Github上去看看效果。编辑E:\hexo下的_config.yml文件,建议使用Notepad++。
在_config.yml最下方,添加如下配置(命令中的第一个leezp为Github的用户名,第二个leezp为之前New的Repository的名字,记得改成自己的。另外记得一点,hexo的配置文件中任何’:’后面都是带一个空格的),如果配置以下命令出现ERROR Deployer not found : github,则$ npm install hexo-deployer-git –save

在_config.yml最下方,添加如下配置

1
2
3
4
deploy:
type: git
repository: http://github.com/leezp/leezp.github.io.git
branch: master

配置好_config.yml并保存后,执行以下命令部署到Github上。如果你是第一次使用Github或者是已经使用过,但没有配置过SSH,则可能需要配置一下,具体方法史上最全github使用方法:github入门到精通里面有介绍到。

1
2
$ hexo g
$ hexo d

执行上面的第二个命令,可能会要你输入用户名和密码,皆为注册Github时的数据,输入密码是不显示任何东西的,输入完毕回车即可。
此时,我们的博客已经搭建起来,并发布到Github上了,在浏览器访问leezp.github.io就能看到自己的博客了。第一次访问刚地址,可能访问不了,您可以在几分钟后进行访问,一般不超过10分钟。

hexo的配置文件

hexo里面有两个常用到的配置文件,分别是整个博客的配置文件D:\hexo_config.yml和主题的配置文件D:\hexo\themes\next_config.yml,此地址是对于我来说,hexo3.0使用的默认主题是landscape,因此你们的地址应该是D:\hexo\themes\landscape_config.yml,下文所有讲到next的地方,你们将之换为自己的主题名即可。
接下来介绍整个博客的配置文件。
D:\hexo_config.yml

1
2
3
4
5
6
7
8
9
10
11
12
13
14
15
16
17
18
19
20
21
22
23
24
25
26
27
28
29
30
31
32
33
34
35
36
37
38
39
40
41
42
43
44
45
46
47
48
49
50
51
52
53
54
55
56
57
58
59
60
61
62
63
64
65
66
67
68
69
70
71
72
73
74
75
76
77
78
79
80
# Hexo Configuration
## Docs: http://hexo.io/docs/configuration.html
## Source: https://github.com/hexojs/hexo/
# Site 这下面的几项配置都很简单,你看我的博客就知道分别是什么意思
title: leezp #博客名
subtitle: #副标题
description: #用于搜索,没有直观表现
author: lee #作者
language: zh-Hans #语言
timezone: #时区,此处不填写,hexo会以你目前电脑的时区为默认值
# URL 暂不配置,使用默认值
## If your site is put in a subdirectory, set url as 'http://yoursite.com/child' and root as '/child/'
url: http://leezp.space #域名
root: /
permalink: :year/:month/:day/:title/
permalink_defaults:
# Directory 暂不配置,使用默认值
source_dir: source
public_dir: public
tag_dir: tags
archive_dir: archives
category_dir: categories
code_dir: downloads/code
i18n_dir: :lang
skip_render:
# Writing 文章布局等,使用默认值
new_post_name: :title.md # File name of new posts
default_layout: post
titlecase: false # Transform title into titlecase
external_link: true # Open external links in new tab
filename_case: 0
render_drafts: false
post_asset_folder: false
relative_link: false
future: true
highlight:
enable: true
line_number: true
tab_replace:
# Category & Tag 暂不配置,使用默认值
default_category: uncategorized
category_map:
tag_map:
# Date / Time format 时间格式,使用默认值
## Hexo uses Moment.js to parse and display date
## You can customize the date format as defined in
## http://momentjs.com/docs/#/displaying/format/
date_format: YYYY-MM-DD
time_format: HH:mm:ss
# Pagination
## Set per_page to 0 to disable pagination
per_page: 10 #每页显示的文章数,0表示不分页
pagination_dir: page
# Extensions 插件配置,暂时不配置
## Plugins: http://hexo.io/plugins/
## Themes: http://hexo.io/themes/
#plugins:
#- hexo-generator-feed
theme: next #使用的主题,即:E:\myblog\themes文件夹下的主题文件夹名
feed: #之后配置rss会用,使用如下配置即可
type: atom
path: atom.xml
limit: 20
# Deployment 用于部署到github,之前已经配置过
## Docs: http://hexo.io/docs/deployment.html
deploy:
type: git
repository: http://github.com/leezp/leezp.github.io.git
branch: master

按照自己的意愿修改完后,执行hexo g,hexo s,打开localhost:4000看看效果。

发表一篇文章

1.在Git Bash执行命令:$ hexo new “my new post”
2.在D:\hexo\source_post中打开my-new-post.md,打开方式使用记事本或notepad++。
hexo中写文章使用的是Markdown,没接触过的可以看下Markdown语法说明。

1
2
3
4
5
6
7
title: my new post #可以改成中文的,如“新文章”
date: 2016-07-16 22:00:00 #发表日期,一般不改动
categories: blog #文章文类
tags: [博客,文章] #文章标签,多于一项时用这种格式,只有一项时使用tags: blog
---
#这里是正文,用markdown写,你可以选择写一段显示在首页的简介后,加上
<!--more--> #在<!--more-->之前的内容会显示在首页,之后的内容会被隐藏,当游客点击Read more才能看到。

写完文章后,你可以使用1.$ hexo g生成静态文件。2.$ hexo s在本地预览效果。3.hexo d同步到github,然后使用http://leezp.github.io进行访问。

另一种发布到github的配置

现在提供另一种配置方式,这种方式在发布时不需要同时输入用户名和邮箱账号,也是我目前使用的方法,配置代码如下。

1
2
3
4
deploy:
type: git
repository: git@github.com:leezp/leezp.github.io.git
branch: master

这种配置方式,需要配置SSH key,教程如下:
鼠标右键任意地方,选择Git Bash,

1
$ ssh-keygen -t rsa -C "your_email@youremail.com"

后面的your_email@youremail.com改为你的邮箱,之后会要求确认路径和输入密码,我们这使用默认的一路回车就行。成功的话会在C:\Users\Administrator下生成.ssh文件夹,进入该文件夹,打开id_rsa.pub,复制里面的key。
回到github,进入Settings,选择SSH and GPG Keys -> New SSH Key,title随便填,粘贴key。为了验证是否成功,在git bash下输入:

1
$ ssh -T git@github.com

如果是第一次的会提示是否continue,输入yes就会看到:You’ve successfully authenticated, but GitHub does not provide shell access ,这就表示已成功连上github。
接下来我们要做的就是把本地仓库传到github上去,在此之前还需要设置username和email,因为github每次commit都会记录他们。

1
2
$ git config --global user.name "your name"
$ git config --global user.email "your_email@youremail.com"

总结

到目前为止,实现了用hexo搭建博客的基本功能。由于本文是博主工作之余写的,比较仓促,难免有错误,欢迎指正。后面的文章将介绍本博客使用到的一些实用的功能,如访问次数,新浪微博秀,RSS,多说评论等,喜欢这些功能的朋友可以继续跟随。

版权声明:本文为博主原创文章,转载请注明出处 Leezp’s Blog

点击按钮打赏作者!