一起学习Spring4.0

从今天起,准备陆续更新Spring4.0的博客,当做自己知识的巩固。

前言

Spring 官网

开发工具:推荐使用Eclipse,我用的是Eclipse 4.3(KEPLER) 64bit 版本。

插件:springsource-tool-suite-3.4.0.RELEASE-e4.3.1-updatesite 注意要安装和自己Eclipse版本相对应的插件

Spring4.0 jar包:spring-framework-4.0.4.RELEASE.rar,下载后解压使用。

正文

Spring 简介

Spring 是一个开源框架。也是一个 IOC (DI) 和 AOP 容器框架。IOC(反转控制),DI(依赖注入)

Spring 是轻量级,非侵入性的(使用Spring的时候不需要实现Spring提供的接口,也不需要继承它的任何父类,可以使用它提供的功能)。Spring 是一个容器,因为它包含并且管理应用对象的生命周期。

核心:
1.依赖注入
2.面向切面编程AOP

Spring 模块:
最底层:Beans,Core,Context,SpringEL

IOC(Inversion of Control):其思想是反转资源获取的方向。传统的资源查找要求组件向容器发起请求查找资源。作为回应,容器适时的返回资源。而应用了IOC之后,则是容器主动地将资源推送给它所管理的组件,组件所要做的仅是选择一种合适的方式来接受资源。这种行为也被称为查找的被动形式。

DI(Dependency Injection):IOC的另一种表述方式:即组件以一种预先定义好的方式(例如:setter方法)接受来自如容器的资源的注入。相对于IOC而言,这种表述更直接。

Spring4.0 简介

Spring4.0是 Spring 推出的一个重大版本升级,进一步加强了 Spring 作为 Java 领域第一开源平台的地位。Spring4.0 引入了众多 Java 开发者期盼的新特性,如泛型依赖注入、SpEL、校验及格式化框架、Rest风格的 WEB 编程模型等。这些新功能实用性强、易用性高,可大幅降低 JavaEE 开发的难度,同时有效提升应用开发的优雅性。

安装Spring Tool Suite

Spring Tool Suite 是一个Eclipse插件,利用该插件可以更方便的在Eclipse平台上开发基于Spring的应用。

打开Eclipse-> Help-> Install New Software…-> Add-> Archive…。
选中刚刚下载的压缩文件,点击打开。

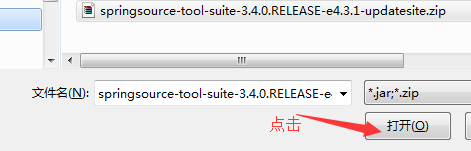
在弹出的Available Software 窗口将4个带 Spring IDE的项勾选,将下面“联网进行更新”复选框去掉。点击下一步…保存更改。

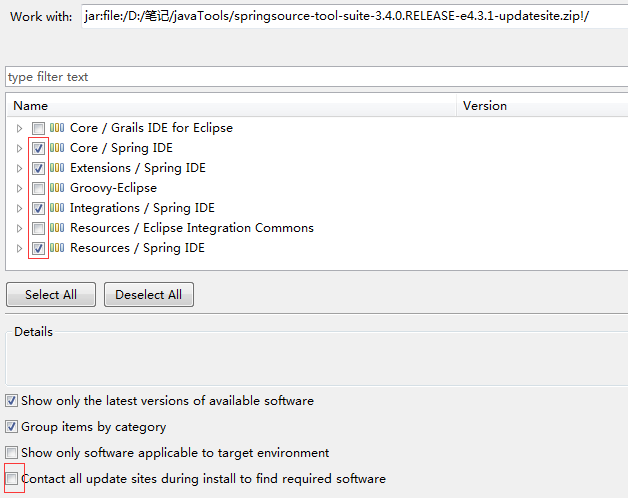
重启Eclipse,点击 Help-> Welcome 打开欢迎页面,显示Spring IDE 图样即为安装成功。

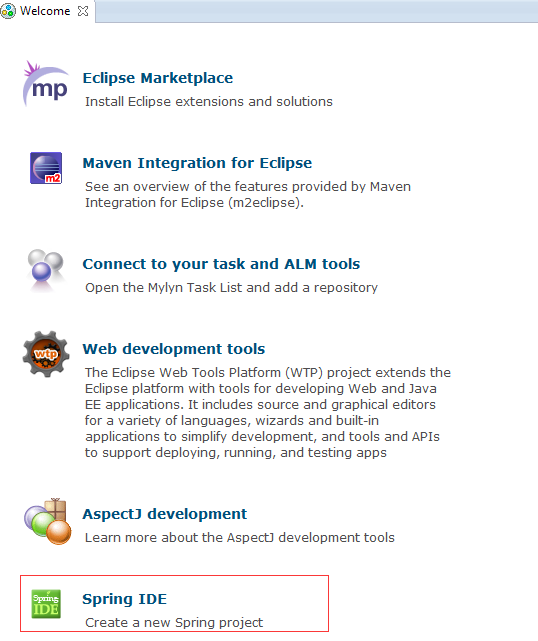
点击 Window-> Preferences,如果看到 Spring,则证明插件已经安装成功。
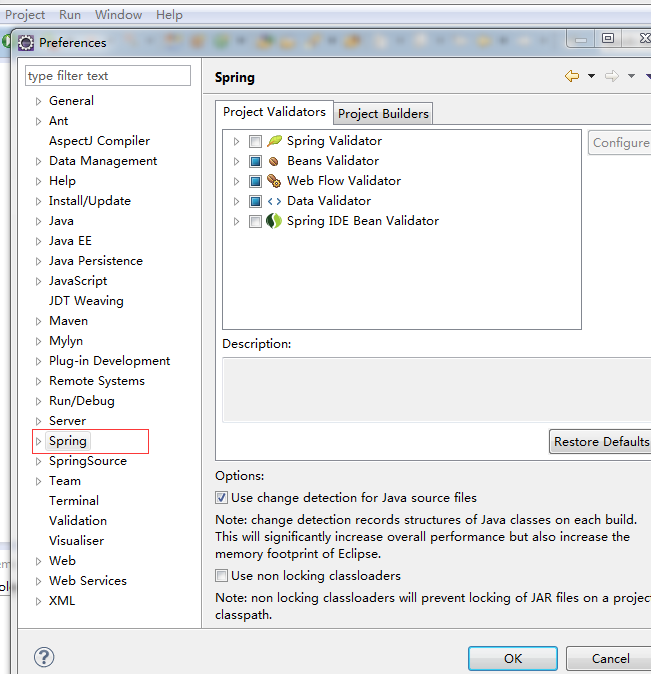
搭建Spring开发环境

在Eclipse新建一个项目,命名为spring-01,新建一个bin文件夹,将所需jar包复制到bin目录下。

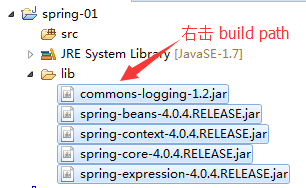
选中导入的jar,右击build path-> Add to Build Path。

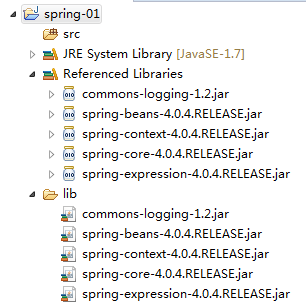
新建一个package,命名为 com.leezp.spring.beans,在该包下新建一个类HelloWorld。

1
2
3
4
5
6
7
8
9
10
11
12
13
14
15
16
17
18
19
20
package com.leezp.spring.beans;
public class HelloWorld {
private String name;
public void setName(String name) {
System.out.println("setName:" + name);
this.name = name;
}
// setValue 这里的value和xml 配置文件里 的property 的name属性的值对应
public void hello() {
System.out.println("hello:" + name);
}
public HelloWorld() {
System.out.println("HelloWorld's Constructor");
}
}

src下new-> Spring Bean Configuration File,命名为applicationContext.xml。

1
2
3
4
5
6
7
8
9
10
11
<?xml version="1.0" encoding="UTF-8"?>
<beans xmlns="http://www.springframework.org/schema/beans"
xmlns:xsi="http://www.w3.org/2001/XMLSchema-instance"
xsi:schemaLocation="http://www.springframework.org/schema/beans http://www.springframework.org/schema/beans/spring-beans.xsd">
<!-- 配置bean -->
<bean id="helloWorld" class="com.leezp.spring.beans.HelloWorld">
<property name="name" value="Spring"></property>
</bean>
</beans>

新建一个Main.java

1
2
3
4
5
6
7
8
9
10
11
12
13
14
15
16
17
18
19
20
21
22
23
24
25
26
package com.leezp.spring.beans;
import org.springframework.context.ApplicationContext;
import org.springframework.context.support.ClassPathXmlApplicationContext;
public class Main {
public static void main(String[] args) {
/*
* // 创建 HelloWorld 的一个对象 HelloWorld helloWorld = new HelloWorld();
* // 为name 属性赋值 helloWorld.setName("lee");
*/
// 1. 创建Spring 的IOC 容器对象
// ApplicationContext代表IOC 容器
ApplicationContext ctx = new ClassPathXmlApplicationContext(
"applicationContext.xml");// 创建对象时即调用它的set方法对属性赋值
// 2. 从IOC容器中获取Bean实例
// HelloWorld helloWorld = (HelloWorld) ctx.getBean("helloWorld");
// HelloWorld helloWorld = ctx.getBean(HelloWorld.class);//这样做有缺点,配置多个
// bean的时候它不知道访问哪一个,只适用于单个bean
// 调用hello方法
// helloWorld.hello();
}
}

运行该文件,在控制台观察结果。

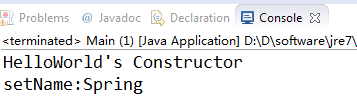
发现不需要在main里对 helloWorld 赋值,只需创建一个Spring的IOC容器对象,自动进行了赋值。

获取源代码

版权声明:本文为博主原创文章,转载请注明出处 Leezp’s Blog

点击按钮打赏作者!