一起学习Spring4.0(三)

在上一节中,我们已经学会了Bean的一些基本配置。

在这一节中,将补充介绍Bean的配置。

沿用上一节的项目。

Bean的其他配置方法

配置Bean之方法二工厂方法

通过调用静态工厂方法创建Bean

调用静态工厂方法创建Bean是将对象创建的过程封装到静态方法中。当客户端需要对象时,只需要简单地调用静态方法,而不用关心创建对象的细节。

要声明通过静态方法创建的Bean
1.在Bean的class属性里指定拥有该工厂方法的类
2.在factory-method属性里指定工厂方法的名称
3.使用<constructor-arg>元素为该方法传递方法参数。

在src下新建包com.leezp.spring.beans.factory。

在该包下新建Car.java。

1
2
3
4
5
6
7
8
9
10
11
12
13
14
15
16
17
18
19
20
21
22
23
24
25
26
27
28
29
30
31
32
33
34
package com.leezp.spring.beans.factory;
public class Car {
private String brand;
private double price;
public String getBrand() {
return brand;
}
public void setBrand(String brand) {
this.brand = brand;
}
public double getPrice() {
return price;
}
public void setPrice(double price) {
this.price = price;
}
@Override
public String toString() {
return "Car [brand=" + brand + ", price=" + price + "]";
}
public Car(String brand, double price) {
super();
this.brand = brand;
this.price = price;
}
}

新建StaticCarFactory.java。

1
2
3
4
5
6
7
8
9
10
11
12
13
14
15
16
17
18
19
20
21
22
23
24
25
package com.leezp.spring.beans.factory;
import java.util.HashMap;
import java.util.Map;
/**
* 静态工厂方法:直接调用某一个类的静态方法就可以返回Bean的实例
*
* @author Lee
*
*/
public class StaticCarFactory {
private static Map<String, Car> cars = new HashMap<String, Car>();
static {
cars.put("audi", new Car("audi", 300000));
cars.put("ford", new Car("ford", 400000));
}
public static Car getCar(String name) {
return cars.get(name);
}
}
```

新建beans-factory.xml配置文件。

1
2
3
4
5
6
7
8
9
10
11
12
13
14
15
``` bash
<?xml version="1.0" encoding="UTF-8"?>
<beans xmlns="http://www.springframework.org/schema/beans"
xmlns:xsi="http://www.w3.org/2001/XMLSchema-instance"
xsi:schemaLocation="http://www.springframework.org/schema/beans http://www.springframework.org/schema/beans/spring-beans.xsd">
<!-- 通过静态工厂方法来配置Bean。注意不是配置静态工厂方法实例,而是配置Bean实例 -->
<!-- class属性:指向静态工厂方法的全类名;factory-method:指向静态工厂方法的名字; constructor-arg:如果工厂方法需要传入参数,则使用constructor-arg
来配置参数 -->
<bean id="car1" class="com.leezp.spring.beans.factory.StaticCarFactory"
factory-method="getCar">
<constructor-arg value="audi"></constructor-arg>
</bean>
</beans>
```

新建Main.java。

1
2
3
4
5
6
7
8
9
10
11
12
13
14
15
16
``` bash
package com.leezp.spring.beans.factory;
import org.springframework.context.ApplicationContext;
import org.springframework.context.support.ClassPathXmlApplicationContext;
public class Main {
public static void main(String[] args) {
ApplicationContext ctx = new ClassPathXmlApplicationContext(
"beans-factory.xml");
Car car1 = (Car) ctx.getBean("car1");新建beans-beanfactory.xml配置文件。
System.out.println(car1);
}
}
```

在控制台观察运行结果。

1
2
3
``` bash
Car [brand=audi, price=300000.0]
```

通过调用实例工厂方法创建Bean

实例工厂方法:将对象的创建过程封装到另外一个对象实例的方法里。当客户端需要请求对象时,只需要简单的调用该实例方法而不需要关心对象的创建细节。

要声明通过实例工厂方法创建的Bean
1.在bean的factory-bean属性里指定拥有该工厂方法的Bean。
2.在factory-method属性里指定该工厂方法的名称。
3.使用constructor-arg元素为工厂方法传递方法参数。

新建InstanceCarFactory.java。

1
2
3
4
5
6
7
8
9
10
11
12
13
14
15
16
17
18
19
20
21
22
23
24
25
``` bash
package com.leezp.spring.beans.factory;
import java.util.HashMap;
import java.util.Map;
/**
* 实例工厂方法:实例工厂的方法,即先需要创建工厂本身,再调用工厂的实例方法
*
* @author Lee
*
*/
public class InstanceCarFactory {
private Map<String, Car> cars = null;
public InstanceCarFactory() {
cars = new HashMap<String, Car>();
cars.put("audi", new Car("audi", 400000));
cars.put("ford", new Car("ford", 300000));
}
public Car getCar(String brand) {
return cars.get(brand);
}
}

修改beans-factory.xml配置文件。

1
2
3
4
5
6
7
8
9
10
11
12
13
14
15
16
17
18
19
20
21
22
23
24
25
<?xml version="1.0" encoding="UTF-8"?>
<beans xmlns="http://www.springframework.org/schema/beans"
xmlns:xsi="http://www.w3.org/2001/XMLSchema-instance"
xsi:schemaLocation="http://www.springframework.org/schema/beans http://www.springframework.org/schema/beans/spring-beans.xsd">
<!-- 通过静态工厂方法来配置Bean。注意不是配置静态工厂方法实例,而是配置Bean实例 -->
<!-- class属性:指向静态工厂方法的全类名;factory-method:指向静态工厂方法的名字; constructor-arg:如果工厂方法需要传入参数,则使用constructor-arg
来配置参数 -->
<bean id="car1" class="com.leezp.spring.beans.factory.StaticCarFactory"
factory-method="getCar">
<constructor-arg value="audi"></constructor-arg>
</bean>
<!-- Invalid bean definition with name 'car2' defined in class path resource
[beans-factory.xml]: factory-bean reference points back to the same bean
definition -->
<!-- 配置工厂的实例 -->
<bean id="carFactory" class="com.leezp.spring.beans.factory.InstanceCarFactory"></bean>
<bean id="car2" factory-bean="carFactory" factory-method="getCar">
<constructor-arg value="audi"></constructor-arg>
</bean>
</beans>

修改Main.java。

1
2
3
4
5
6
7
8
9
10
11
12
13
14
15
16
17
18
package com.leezp.spring.beans.factory;
import org.springframework.context.ApplicationContext;
import org.springframework.context.support.ClassPathXmlApplicationContext;
public class Main {
public static void main(String[] args) {
ApplicationContext ctx = new ClassPathXmlApplicationContext(
"beans-factory.xml");
Car car1 = (Car) ctx.getBean("car1");
System.out.println(car1);
Car car2 = (Car) ctx.getBean("car2");
System.out.println(car2);
}
}

在控制台观察运行结果。

1
2
3
Car [brand=audi, price=300000.0]
Car [brand=audi, price=400000.0]
```

获取源代码

配置Bean之方法三FactoryBean

新建包com.leezp.spring.beans.factorybean。

在该包下新建Car.java。

1
2
3
4
5
6
7
8
9
10
11
12
13
14
15
16
17
18
19
20
21
22
23
24
25
26
27
28
29
30
31
32
33
34
35
36
``` bash
package com.leezp.spring.beans.factorybean;
public class Car {
private String brand;
private double price;
public String getBrand() {
return brand;
}
public void setBrand(String brand) {
this.brand = brand;
}
public double getPrice() {
return price;
}
public void setPrice(double price) {
this.price = price;
}
@Override
public String toString() {
return "Car [brand=" + brand + ", price=" + price + "]";
}
public Car(String brand, double price) {
super();
this.brand = brand;
this.price = price;
}
}
```

新建CarFactoryBean.java。

1
2
3
4
5
6
7
8
9
10
11
12
13
14
15
16
17
18
19
20
21
22
23
24
25
26
27
28
29
30
31
32
33
``` bash
package com.leezp.spring.beans.factorybean;
import org.springframework.beans.factory.FactoryBean;
//自定义的FactoryBean需要实现 FactoryBean 接口
public class CarFactoryBean implements FactoryBean<Car> {
private String brand;
public void setBrand(String brand) {
this.brand = brand;
}
// 返回Bean的对象
@Override
public Car getObject() throws Exception {
return new Car("BMW", 500000);
}
// 返回bean的类型
@Override
public Class<?> getObjectType() {
return Car.class;
}
// 是否为单实例
@Override
public boolean isSingleton() {
return true;
}
}

新建beans-beanfactory.xml配置文件。

1
2
3
4
5
6
7
8
9
10
11
12
13
14
15
16
17
18
19
20
21
22
23
24
25
26
27
28
29
30
31
32
package com.leezp.spring.beans.factorybean;
import org.springframework.beans.factory.FactoryBean;
//自定义的FactoryBean需要实现 FactoryBean 接口
public class CarFactoryBean implements FactoryBean<Car> {
private String brand;
public void setBrand(String brand) {
this.brand = brand;
}
// 返回Bean的对象
@Override
public Car getObject() throws Exception {
return new Car("BMW", 500000);
}
// 返回bean的类型
@Override
public Class<?> getObjectType() {
return Car.class;
}
// 是否为单实例
@Override
public boolean isSingleton() {
return true;
}
}

新建Main.java。

1
2
3
4
5
6
7
8
9
10
11
12
13
14
15
package com.leezp.spring.beans.factorybean;
import org.springframework.context.ApplicationContext;
import org.springframework.context.support.ClassPathXmlApplicationContext;
public class Main {
public static void main(String[] args) {
ApplicationContext ctx = new ClassPathXmlApplicationContext(
"beans-beanfactory.xml");
Car c = (Car) ctx.getBean("car");
System.out.println(c);
}
}
```

在控制台观察运行结果。

1
2
3
``` bash
Car [brand=BMW, price=500000.0]
```

获取源代码

Bean的第二种配置形式——基于注解的方式

spring从2.5版本开始支持注解注入,注解注入可以省去很多的xml配置工作。由于注解是写入java代码中的,所以注解注入会失去一定的灵活性,我们要根据需要来选择是否启用注解注入。

在classpath中扫描组件

组件扫描(component scanning):Spring能够从classpath下自动扫描,侦测和实例化具有特定注解的组件。

特定组件包括:
1.@Component:基本注解,标识了一个受Spring管理的组件
2.@Repository:标识持久层组件(可将DAO类声明为Bean )
3.@Service:标识服务层(业务层)组件
4.@Controller:标识表现层组件

对于扫描到的组件,Spring有默认的命名策略:使用非限定类名,第一个字母小写。也可以在注解中通过value属性值标识组件的名称

当在组件类上使用了特定的注解之后,还需要在Spring的配置文件中声明<context:component-scan>:
1.base-package属性指定一个需要扫描的基类包,Spring容器将会扫描这个基类包里及其子包中的所有类
2.当需要扫描多个包时,可以使用逗号分隔
3.如果仅希望扫描特定的类而非基包下的所有类,可使用resource-pattern属性过滤特定的类,示例:

1
2
3
4
``` bash
<context:component-scan base-package="com.leezp.spring.beans"
resource-pattern="autowire/*.class" />
```

4.<context:include-filter>子节点表示要包含的目标类。
5.<context:exclude-filter>子节点表示要排除在外的目标类。
6.<context:component-scan>下可以拥有若干个<context:include-filter>和<context:exclude-filter>子节点。
<context:include-filter>和<context:exclude-filter>子节点支持多种类型的过滤表达式:

filter标签的type和表达式说明如下图。

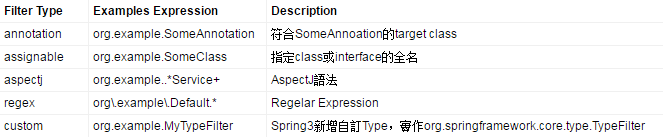
annotation:所有标注了XxxAnnotation的类。该类型采用目标类是否标注了某个注解进行过滤。
assinable:所有继承或扩展XxxService的类。该类型采用目标类是否继承或扩展某个特定类进行过滤。
aspectj:所有类名以Service结束的类及继承或扩展它们的类。该类型采用aspectj表达式进行过滤。
regex:示例:com.\leezp.anno_*:所有com.leezp.anno包下的类。该类型采用正则表达式根据类的类名进行过滤
custom:采用XxxTypeFilter通过代码的方式定义过滤规则。该类必须实现org.springframework.core.type.TypeFilter接口。

新建包com.leezp.spring.beans.annotation。

在该包下新建TestObject.java。

1
2
3
4
5
6
7
8
9
10
11
``` bash
package com.leezp.spring.beans.annotation;
import org.springframework.stereotype.Component;
// 只加了@Component以后项目名称右上角还没有"S"的小标签,说明还没有被Spring管理,还要建立Spring配置文件才可以
@Component
public class TestObject {
}
```

新建包com.leezp.spring.beans.annotation.controller。

在该包下新建UserController.java。

1
2
3
4
5
6
7
8
9
10
11
12
13
``` bash
package com.leezp.spring.beans.annotation.controller;
import org.springframework.stereotype.Controller;
@Controller
public class UserController {
public void execute() {
System.out.println("UserController execute...");
}
}
```

新建包com.leezp.spring.beans.annotation.repository。

在该包下新建UserRepository.java接口。

1
2
3
4
5
6
7
8
``` bash
package com.leezp.spring.beans.annotation.repository;
public interface UserRepository {
void save();
}
```

在该包下新建UserRepository接口的实现类UserRepositoryImpl.java。

1
2
3
4
5
6
7
8
9
10
11
12
13
14
15
``` bash
package com.leezp.spring.beans.annotation.repository;
import org.springframework.stereotype.Repository;
@Repository("userRepository")
public class UserRepositoryImpl implements UserRepository {
@Override
public void save() {
System.out.println("UserRepository Save...");
}
}
```

新建包com.leezp.spring.beans.annotation.service。

在该包下新建业务类UserService.java。

1
2
3
4
5
6
7
8
9
10
11
12
13
``` bash
package com.leezp.spring.beans.annotation.service;
import org.springframework.stereotype.Service;
@Service
public class UserService {
public void add() {
System.out.println("UserService add...");
}
}
```

新建beans-annotation.xml配置文件。

1
2
3
4
5
6
7
8
9
10
11
12
13
14
15
16
17
18
19
20
21
22
23
24
25
26
27
28
29
30
31
32
33
34
35
36
``` bash
<?xml version="1.0" encoding="UTF-8"?>
<beans xmlns="http://www.springframework.org/schema/beans"
xmlns:xsi="http://www.w3.org/2001/XMLSchema-instance" xmlns:context="http://www.springframework.org/schema/context"
xsi:schemaLocation="http://www.springframework.org/schema/beans http://www.springframework.org/schema/beans/spring-beans.xsd
http://www.springframework.org/schema/context http://www.springframework.org/schema/context/spring-context-4.0.xsd">
<!-- 指定SpringIOC容器扫描的包 -->
<!-- 加上下面这个配置以后项目名称右上角出现"S"的小标签,说明已被Spring管理 -->
<!-- <context:component-scan base-package="com.leezp.spring.beans.annotation"></context:component-scan> -->
<!-- 可以通过resource-pattern指定扫描的资源 -->
<!-- <context:component-scan base-package="com.leezp.spring.beans.annotation"
resource-pattern="repository/*.class"></context:component-scan> -->
<!-- context:exclude-filter子节点指定排除哪些指定表达式的组件 ,将不想包含的包粘贴进来 -->
<!-- <context:component-scan base-package="com.leezp.spring.beans.annotation">
<context:exclude-filter type="annotation" expression="org.springframework.stereotype.Repository"
/> </context:component-scan> -->
<!-- context:include-filter子节点指定包含哪些表达式的组件,该子节点需要设置use-default-filters="false" -->
<!-- <context:component-scan base-package="com.leezp.spring.beans.annotation"
use-default-filters="false"> <context:include-filter type="annotation" expression="org.springframework.stereotype.Repository"
/> </context:component-scan> -->
<!-- 不包含UserRepository接口和这个接口所有实现类 -->
<context:component-scan base-package="com.leezp.spring.beans.annotation">
<context:exclude-filter type="assignable"
expression="com.leezp.spring.beans.annotation.repository.UserRepository" />
</context:component-scan>
<!-- <context:component-scan base-package="com.leezp.spring.beans.annotation"
use-default-filters="false"> <context:include-filter type="assignable" expression="com.leezp.spring.beans.annotation.repository.UserRepository"
/> </context:component-scan> -->
</beans>

在com.leezp.spring.beans.annotation包下新建Main.java。

1
2
3
4
5
6
7
8
9
10
11
12
13
14
15
16
17
18
19
20
21
22
23
24
25
26
27
28
29
30
31
32
33
34
35
36
37
38
39
40
package com.leezp.spring.beans.annotation;
import org.springframework.context.ApplicationContext;
import org.springframework.context.support.ClassPathXmlApplicationContext;
import com.leezp.spring.beans.annotation.controller.UserController;
import com.leezp.spring.beans.annotation.repository.UserRepository;
import com.leezp.spring.beans.annotation.repository.UserRepositoryImpl;
import com.leezp.spring.beans.annotation.service.UserService;
public class Main {
public static void main(String[] args) {
ApplicationContext ctx = new ClassPathXmlApplicationContext(
"beans-annotation.xml");
// java.lang.ClassNotFoundException:
// org.springframework.aop.TargetSource
// 这个异常是因为缺少jar包,只需导入spring-aop-4.0.4.RELEASE.jar即可。
TestObject to = (TestObject) ctx.getBean("testObject");
System.out.println(to);
UserController u = (UserController) ctx.getBean("userController");
System.out.println(u);
UserService us = (UserService) ctx.getBean("userService");
System.out.println(us);
/*
* UserRepository ur = (UserRepository) ctx.getBean("userRepository");
* System.out.println(ur);
*/
/*
* UserRepositoryImpl xxx = (UserRepositoryImpl) ctx
* .getBean("userRepository"); System.out.println(xxx);
*/
}
}
```

这里可能还需要一个Spring的jar包spring-aop-4.0.4.RELEASE.jar,点击下载spring-framework-4.0.4.RELEASE.rar(Spring所需jar包),在里面找到这个jar包添加到项目中并且build path。缺少这个jar包可能报出java.lang.ClassNotFoundException:org.springframework.aop.TargetSource错误。
在控制台观察运行结果。

1
2
3
4
5
``` bash
com.leezp.spring.beans.annotation.TestObject@3e431f96
com.leezp.spring.beans.annotation.controller.UserController@28ced0c9
com.leezp.spring.beans.annotation.service.UserService@21ed510d
```

获取源代码

利用注解来建立Bean之间的引用关系

有时候Bean之间是有关联关系的。我们先来建立Bean之间的关联关系,再来研究如何利用注解来建立Bean之间的引用关系。

修改beans-annotation.xml配置文件。

1
2
3
4
5
6
7
8
9
10
11
12
13
14
15
16
17
18
19
20
21
22
23
24
25
26
27
28
29
30
31
32
33
34
35
36
``` bash
<?xml version="1.0" encoding="UTF-8"?>
<beans xmlns="http://www.springframework.org/schema/beans"
xmlns:xsi="http://www.w3.org/2001/XMLSchema-instance" xmlns:context="http://www.springframework.org/schema/context"
xsi:schemaLocation="http://www.springframework.org/schema/beans http://www.springframework.org/schema/beans/spring-beans.xsd
http://www.springframework.org/schema/context http://www.springframework.org/schema/context/spring-context-4.0.xsd">
<!-- 指定SpringIOC容器扫描的包 -->
<!-- 加上下面这个配置以后项目名称右上角出现"S"的小标签,说明已被Spring管理 -->
<context:component-scan base-package="com.leezp.spring.beans.annotation"></context:component-scan>
<!-- 可以通过resource-pattern指定扫描的资源 -->
<!-- <context:component-scan base-package="com.leezp.spring.beans.annotation"
resource-pattern="repository/*.class"></context:component-scan> -->
<!-- context:exclude-filter子节点指定排除哪些指定表达式的组件 ,将不想包含的包粘贴进来 -->
<!-- <context:component-scan base-package="com.leezp.spring.beans.annotation">
<context:exclude-filter type="annotation" expression="org.springframework.stereotype.Repository"
/> </context:component-scan> -->
<!-- context:include-filter子节点指定包含哪些表达式的组件,该子节点需要设置use-default-filters="false" -->
<!-- <context:component-scan base-package="com.leezp.spring.beans.annotation"
use-default-filters="false"> <context:include-filter type="annotation" expression="org.springframework.stereotype.Repository"
/> </context:component-scan> -->
<!-- 不包含UserRepository接口和这个接口所有实现类 -->
<!-- <context:component-scan base-package="com.leezp.spring.beans.annotation">
<context:exclude-filter type="assignable" expression="com.leezp.spring.beans.annotation.repository.UserRepository"
/> </context:component-scan> -->
<!-- <context:component-scan base-package="com.leezp.spring.beans.annotation"
use-default-filters="false"> <context:include-filter type="assignable" expression="com.leezp.spring.beans.annotation.repository.UserRepository"
/> </context:component-scan> -->
</beans>
```

修改UserController.java。

1
2
3
4
5
6
7
8
9
10
11
12
13
14
15
16
17
18
``` bash
package com.leezp.spring.beans.annotation.controller;
import org.springframework.stereotype.Controller;
import com.leezp.spring.beans.annotation.service.UserService;
@Controller
public class UserController {
private UserService userService;
public void execute() {
System.out.println("UserController execute...");
userService.add();
}
}
```

修改UserService.java。

1
2
3
4
5
6
7
8
9
10
11
12
13
14
15
16
17
18
19
20
21
22
``` bash
package com.leezp.spring.beans.annotation.service;
import org.springframework.stereotype.Service;
import com.leezp.spring.beans.annotation.repository.UserRepository;
@Service
public class UserService {
private UserRepository userRepository;
public void setUserRepository(UserRepository userRepository) {
this.userRepository = userRepository;
}
public void add() {
System.out.println("UserService add...");
userRepository.save();
}
}
```

修改Main.java。

1
2
3
4
5
6
7
8
9
10
11
12
13
14
15
16
17
18
19
20
21
22
23
24
25
26
27
28
29
30
31
32
33
34
35
36
37
38
39
40
41
42
43
44
45
46
``` bash
package com.leezp.spring.beans.annotation;
import org.springframework.context.ApplicationContext;
import org.springframework.context.support.ClassPathXmlApplicationContext;
import com.leezp.spring.beans.annotation.controller.UserController;
import com.leezp.spring.beans.annotation.repository.UserRepository;
import com.leezp.spring.beans.annotation.repository.UserRepositoryImpl;
import com.leezp.spring.beans.annotation.service.UserService;
public class Main {
public static void main(String[] args) {
ApplicationContext ctx = new ClassPathXmlApplicationContext(
"beans-annotation.xml");
// java.lang.ClassNotFoundException:
// org.springframework.aop.TargetSource
// 这个异常是因为缺少jar包,只需导入spring-aop-4.0.4.RELEASE.jar即可。
/*
* TestObject to = (TestObject) ctx.getBean("testObject");
* System.out.println(to);
*/
UserController u = (UserController) ctx.getBean("userController");
System.out.println(u);
u.execute();
/*
* UserService us = (UserService) ctx.getBean("userService");
* System.out.println(us);
*/
/*
* UserRepository ur = (UserRepository) ctx.getBean("userRepository");
* System.out.println(ur);
*/
/*
* UserRepositoryImpl xxx = (UserRepositoryImpl) ctx
* .getBean("userRepository"); System.out.println(xxx);
*/
}
}
```

在控制台观察运行结果。

1
2
3
4
5
6
7
``` bash
com.leezp.spring.beans.annotation.controller.UserController@e28adfb
UserController execute...
Exception in thread "main" java.lang.NullPointerException
at com.leezp.spring.beans.annotation.controller.UserController.execute(UserController.java:14)
at com.leezp.spring.beans.annotation.Main.main(Main.java:27)
```

发现报错了。这个错误是因为属性没有被装配。

<context:component-scan>元素还会自动注册AutowiredAnnotationBeanPostProcessor(后置处理器)实例,该实例可以自动装配具有@Autowired@Resource@Inject注解的属性。

使用@Autowired自动装配Bean

@Autowired注解自动装配具有兼容类型的单个Bean属性。
1.构造器,普通字段(即使是非public),一切具有参数的方法(set方法上面)都可以应用@Autowired注解

给UserController.java添加注解@Autowired。

1
2
3
4
5
6
7
8
9
10
11
12
13
14
15
16
17
18
19
``` bash
package com.leezp.spring.beans.annotation.controller;
import org.springframework.beans.factory.annotation.Autowired;
import org.springframework.stereotype.Controller;
import com.leezp.spring.beans.annotation.service.UserService;
@Controller
public class UserController {
@Autowired
private UserService userService;
public void execute() {
System.out.println("UserController execute...");
userService.add();
}
}
```

给UserService.java添加注解@Autowired。

1
2
3
4
5
6
7
8
9
10
11
12
13
14
15
16
17
18
19
20
21
22
23
24
25
``` bash
package com.leezp.spring.beans.annotation.service;
import org.springframework.beans.factory.annotation.Autowired;
import org.springframework.stereotype.Service;
import com.leezp.spring.beans.annotation.repository.UserRepository;
@Service
public class UserService {
// @Autowired//构造器,普通字段(即使是非public)都可以应用@Autowired注解
private UserRepository userRepository;
@Autowired
// 一切具有参数的方法(set方法上面)都可以应用@Autowired注解
public void setUserRepository(UserRepository userRepository) {
this.userRepository = userRepository;
}
public void add() {
System.out.println("UserService add...");
userRepository.save();
}
}
```

在控制台观察运行结果。

1
2
3
4
5
6
``` bash
com.leezp.spring.beans.annotation.controller.UserController@730d27f7
UserController execute...
UserService add...
UserRepository Save...
```

2.默认情况下,所有使用@Autowired注解的属性都需要被设置,当Spring找不到匹配的Bean装配属性时,会抛出异常,若某一属性允许不被设置,可以设置@Autowired注解的required属性为false

修改UserRepositoryImpl.java添加关联关系TestObject。

1
2
3
4
5
6
7
8
9
10
11
12
13
14
15
16
17
18
19
20
21
``` bash
package com.leezp.spring.beans.annotation.repository;
import org.springframework.beans.factory.annotation.Autowired;
import org.springframework.stereotype.Repository;
import com.leezp.spring.beans.annotation.TestObject;
@Repository("userRepository")
public class UserRepositoryImpl implements UserRepository {
@Autowired
private TestObject testObject;
@Override
public void save() {
System.out.println("UserRepository Save...");
System.out.println(testObject);
}
}
```

在控制台观察运行结果。

1
2
3
4
5
6
7
```
com.leezp.spring.beans.annotation.controller.UserController@64bb0423
UserController execute...
UserService add...
UserRepository Save...
com.leezp.spring.beans.annotation.TestObject@320cc97f
```

修改TestObject.java去掉@Component使Spring找不到匹配的Bean装配属性。

1
2
3
4
5
6
7
8
9
10
``` bash
package com.leezp.spring.beans.annotation;
import org.springframework.stereotype.Component;
// 只加了@Component以后项目名称右上角还没有"S"的小标签,说明还没有被Spring管理,还要建立Spring配置文件才可以
public class TestObject {
}

在控制台观察运行结果发现报错:No qualifying bean of type

修改UserRepositoryImpl.java改为@Autowired(required=false)

1
2
3
4
5
6
7
8
9
10
11
12
13
14
15
16
import org.springframework.stereotype.Repository;
import com.leezp.spring.beans.annotation.TestObject;
@Repository("userRepository")
public class UserRepositoryImpl implements UserRepository {
@Autowired(required=false)
private TestObject testObject;
@Override
public void save() {
System.out.println("UserRepository Save...");
System.out.println(testObject);
}
}

在控制台观察运行结果。

1
2
3
4
5
6
com.leezp.spring.beans.annotation.controller.UserController@27cacbd9
UserController execute...
UserService add...
UserRepository Save...
null
```

3.默认情况下,当IOC容器里存在多个类型兼容的Bean时,通过类型的自动装配将无法工作,此时可以在@Qualifier注解里提供Bean的名称,Spring允许对方法的入参标注@Qualifier已指定注入Bean的名称

@Qualifier(“XXX”) 中的 XX是 Bean 的名称,所以 @Autowired 和@Qualifier 结合使用时,自动注入的策略就从 byType 转变成 byName 了

百度百科 @Qualifier

在包com.leezp.spring.beans.annotation.repository下新建类UserJdbcRepository.java。

1
2
3
4
5
6
7
8
9
10
11
12
13
14
``` bash
package com.leezp.spring.beans.annotation.repository;
import org.springframework.stereotype.Repository;
@Repository
public class UserJdbcRepository implements UserRepository{
@Override
public void save() {
System.out.println("UserJdbcRepository save...");
}
}

此时即为多个相同类型的bean

解决方法一:@Repository() 括号里的Bean的名字刚好是首字母小写的属性名,即与属性名对应。

解决方法二:@Qualifier注解指定装配哪一个指定的bean。

修改UserService.java。

1
2
3
4
5
6
7
8
9
10
11
12
13
14
15
16
17
18
19
20
21
22
23
24
25
26
27
28
29
30
31
32
33
34
35
package com.leezp.spring.beans.annotation.service;
import org.springframework.beans.factory.annotation.Autowired;
import org.springframework.beans.factory.annotation.Qualifier;
import org.springframework.stereotype.Service;
import com.leezp.spring.beans.annotation.repository.UserRepository;
@Service
public class UserService {
// @Autowired//构造器,普通字段(即使是非public)都可以应用@Autowired注解
private UserRepository userRepository;
/*
* @Autowired
* //@Qualifier使用方式一
* @Qualifier("userRepositoryImpl") // 一切具有参数的方法(set方法上面)都可以应用@Autowired注解
* public void setUserRepository(UserRepository userRepository) {
* this.userRepository = userRepository; }
*/
@Autowired
//@Qualifier使用方式二
// 一切具有参数的方法(set方法上面)都可以应用@Autowired注解
public void setUserRepository(
@Qualifier("userRepositoryImpl") UserRepository userRepository) {
this.userRepository = userRepository;
}
public void add() {
System.out.println("UserService add...");
userRepository.save();
}
}
```

4.@Autowired注解也可以应用在数组类型的属性上,此时Spring将会把所有匹配的Bean进行自动装配。
5.@Autowired注解也可以应用在集合属性上,此时Spring读取该集合的类型信息,然后自动装配所有与之兼容的Bean。
6.@Autowired注解用在java.util.Map上时,若该Map的键值为Spring,那么Spring将自动装配与之Map值类型兼容的Bean,此时Bean的名称作为健值。

使用@Resource或@Inject自动装配Bean

1.Spring还支持@Resource和@Inject注解,这两个注解和@Autowired注解的功用类似。
2.@Resource注解要求提供一个Bean名称的属性,若该属性为空,则自动采用标注处的变量或方法名作为Bean的名称
3.@Inject和@Autowired注解一样也是按类型匹配注入的Bean,但没有required属性。
4.建议使用@Autowired注解

获取源代码

Spring4.x 新特性: 泛型依赖注入

Spring 4.x中可以为子类注入子类对应的泛型类型的成员变量的引用。
通俗一点来说:两个子类之间的依赖关系不需要在子类中去声明,而是在父类中进行了声明,而依赖的纽带就是 泛型类型,必须是相同的父类泛型类型才具有依赖关系。

新建包com.leezp.spring.beans.generic.di。
在该包下新建BaseRepository.java。

1
2
3
4
5
6
``` bash
package com.leezp.spring.beans.generic.di;
public class BaseRepository<T> {
}

在该包下新建BaseService.java。

1
2
3
4
5
6
7
8
9
10
11
12
13
14
package com.leezp.spring.beans.generic.di;
import org.springframework.beans.factory.annotation.Autowired;
public class BaseService<T> {
@Autowired //在这里加注解会被子类继承
protected BaseRepository<T> repository;
public void add() {
System.out.println("add...");
System.out.println(repository);
}
}

新建UserRepository.java。

1
2
3
4
5
6
7
8
9
package com.leezp.spring.beans.generic.di;
import org.springframework.stereotype.Repository;
@Repository
public class UserRepository extends BaseRepository<User>{
}
```

新建UserService.java。

1
2
3
4
5
6
7
8
9
10
``` bash
package com.leezp.spring.beans.generic.di;
import org.springframework.stereotype.Service;
@Service
public class UserService extends BaseService<User>{
}
```

新建User.java。

1
2
3
4
5
6
``` bash
package com.leezp.spring.beans.generic.di;
public class User{
}

新建Main.java。

1
2
3
4
5
6
7
8
9
10
11
12
13
14
package com.leezp.spring.beans.generic.di;
import org.springframework.context.ApplicationContext;
import org.springframework.context.support.ClassPathXmlApplicationContext;
public class Main {
public static void main(String[] args) {
ApplicationContext ctx = new ClassPathXmlApplicationContext(
"beans-generic-di.xml");
UserService us = (UserService) ctx.getBean("userService");
us.add();
}
}

在控制台观察运行结果。

1
2
add...
com.leezp.spring.beans.generic.di.UserRepository@690a614

在以上的代码中,BaseService中引用了BaseRepository,并且在BaseService的add方法中调用了BaseRepository的add方法
在他们的子类中,继承了这种关系,因此我们在测试方法中调用userService.add(); 也是可以成功地调用UserRepository中的add方法。
获取源代码


参考文献
Spring jar包详解

版权声明:本文为博主原创文章,转载请注明出处 Leezp’s Blog

点击按钮打赏作者!