本节讲述Spring整合Struts2。
准备
Struts2官方示例jar包:struts2.3.15.3-blank
struts-2.3.15.3-lib
struts2官方示例web.xml
struts2官方配置文件struts.xml
spring4-required jar
Spring如何在WEB应用中使用
1).需要额外导入两个jar包。
spring-web-4.0.4.RELEASE.jar
spring-webmvc-4.0.4.RELEASE.jar
2).Spring的配置文件,和非WEB环境没有什么不同
3).需要在web.xml文件中加入如下配置:
|
|
4).如何创建IOC容器。
①.非WEB应用:在main方法中直接创建。
②.WEB应用:在WEB应用被服务器加载时就创建IOC容器:
在ServletContextListener#contextInitialized(ServletContextEvent sce)方法中创建IOC容器。
③.在WEB应用的其他组件中如何来访问IOC容器:
在ServletContextListener#contextInitialized(ServletContextEvent sce)方法中创建IOC容器后,可以把其放在ServletContext(即application 域)的一个属性中。
④.实际上,Spring配置文件的名字和位置应该也是可配置的!将其配置到当前WEB应用的初始化参数中较为合适。
点击new-> Other-> Dynamic web project,新建一个Web项目spring-05。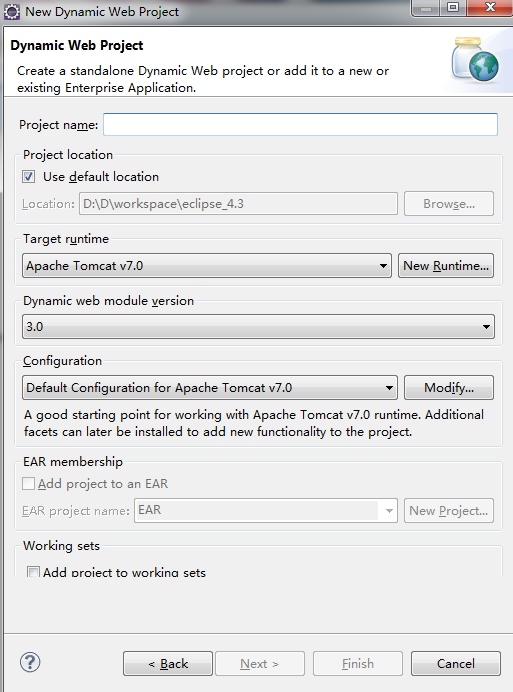
导入spring4-required jar包。
新建包com.leezp.spring.struts2.beans。在该包下新建Person.java。
|
|
新建Spring配置文件applicationContext.xml。
|
|
在项目下新建包com.leezp.spring.struts2.listeners。
点击new-> Other-> Listener创建一个监听器。在Class Name项里填写监听器的名字。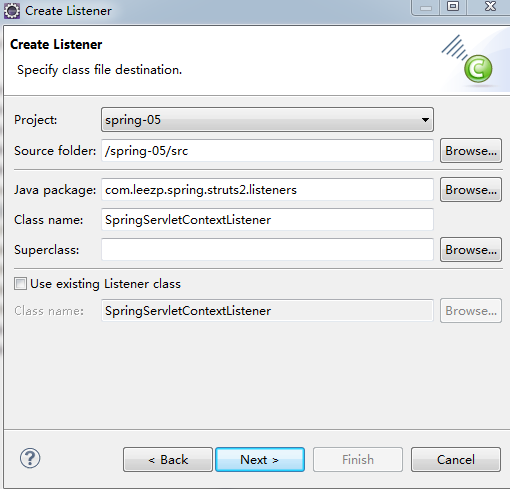
点击Next,选择相应监听器。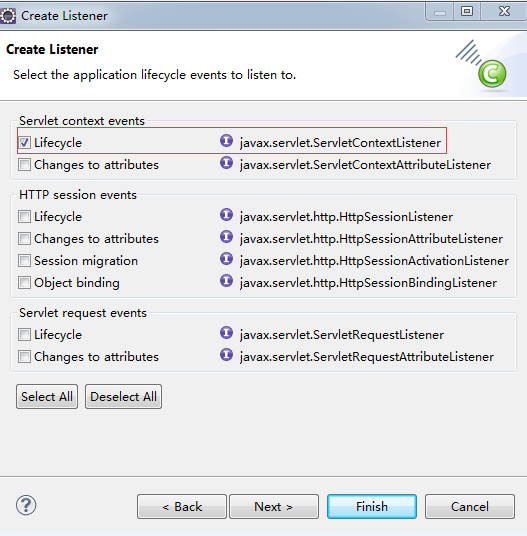
点击finish。
查看新建的监听器SpringServletContextListener.java。
|
|
在该监听器的contextInitialized()方法中创建IOC容器:
|
|
修改配置文件web.xml。
新建包com.leezp.spring.struts2.servlets。在该包下新建Servlet类TestServlet.java。
|
|
新建web页面index.jsp。
|
|
运行项目,鼠标单击项目,右击,run as-> run on server-> next…
Spring如何整合Struts2
1).整合目标:使IOC容器来管理Struts2的Action!
2).整合方法:
①.正常加入Struts2
web.xml里加入Struts2的过滤器
添加Struts2的配置文件struts.xml。
②.在Spring的IOC容器中配置struts2的Action。
注意:在IOC容器中配置Struts2的Action时,需要配置scope属性,其值必须为prototype,即struts2的action是非单例的
|
|
③.配置Struts2的配置文件
action节点的class属性不能再指向全类名,需要指向IOC容器中该bean的id。
|
|
④.导入jar:struts2-spring-plugin-2.3.15.3.jar
3).整合原理:通过添加struts2-spring-plugin-2.3.15.3.jar以后,Struts2会先从IOC容器中获取Action的实例。
具体可以看Struts2的源码,在父类SpringObjectFactory.java的buildBean()方法里做了如下判断。
新建一个web项目spring-06。导入spring4-required jar包。
新建包com.leezp.spring.struts2.beans。在该包下新建Person.java。
|
|
新建包com.leezp.spring.struts2.services。在该包下新建PersonService.java。
|
|
新建包com.leezp.spring.struts2.actions。在该包下新建PersonAction.java。
|
|
复制struts2官方示例web.xml里的内容到web.xml并修改web.xml。
|
|
新建Spring配置文件applicationContext.xml。
|
|
新建struts.xml。复制struts2官方配置文件struts.xml内容到struts.xml并修改这个文件。
|
|
新建web页面success.jsp。
|
|
新建web页面index.jsp。
|
|
在该页面右击,Run As-> Run on Server启动Apache服务器进行测试。点击页面的”Person Save”链接。
在控制台观察运行结果。
|
|
新建web页面test.jsp。
|
|
在该页面右击,Run As-> Run on Server启动Apache服务器进行测试。
在控制台观察运行结果。
|
|
参考文献
struts2.3.15.3-blank
struts2官方示例web.xml
struts2官方配置文件struts.xml
版权声明:本文为博主原创文章,转载请注明出处 Leezp’s Blog